
I'm back with another simple DIY project! My sister and I decided that we wanted to make a graduation gift for our cousin Jami. Money is the customary gift but since neither of us has enough money to give her a gift that would seem even slightly substantial, we decided to go the DIY route. With Jami beginning college in the fall we thought we would make her something that she could use in her dorm room. We settled on a magnetic chalkboard that she could hang on her dorm room door. When I was in school people had those white boards on their doors but we wanted to make something way cooler than any board that you could just pick up at the student bookstore. Obviously this is the way we did it but you could change it up to suit your taste. It was not difficult at all but it took awhile. Mainly because of drying time for the paint and the fact that I can only spend about 15 minutes at a time crafting before I have a little one crawling all over me...or I start it at 10:30pm after dinner, bath and bed and I don't last very long...
Want to make your own?
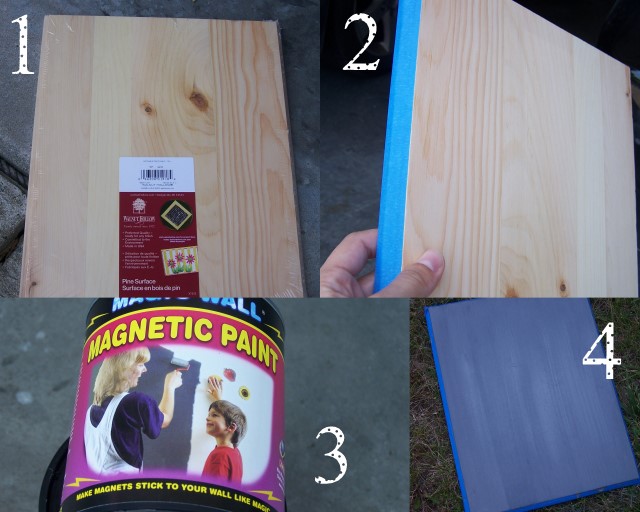
1}. Gather your supplies: wood board, magnetic paint, chalkboard paint, painters tape, acrylic paint, wooden letters, magnets, embellishments, ribbon, clothes pin, glue gun. 2}. Tape off your board to paint the top. 3}. Using your magnetic paint, paint several coats onto your board. Suggested 2-4 coats, we did 6, lol! The more you use, the more magnetic it becomes. 4}. Let paint dry for 24 hours then lightly sand to smooth surface.
![]() 5}. Select the wooden letters you are using. 6}. Paint several coats of acrylic paint. Let dry. 7}. Paint the edges any color of your chosing. Let dry. 8}. We taped off the letter "J" to make the line for the logo for SJU, representing the "t" and the "j." 9}. Top letters with any additional paint and/or touchups. Let dry.
5}. Select the wooden letters you are using. 6}. Paint several coats of acrylic paint. Let dry. 7}. Paint the edges any color of your chosing. Let dry. 8}. We taped off the letter "J" to make the line for the logo for SJU, representing the "t" and the "j." 9}. Top letters with any additional paint and/or touchups. Let dry.
![]() 10}. After magnetic paint is dry and board is sanded, use chalkboard paint to cover the magnetic paint. 11}. We painted 2 coats. Let dry for 24 hours. 12}. Dismantle clothespin and paint. Let dry. 13}. Assemble clothespin with chalk.
10}. After magnetic paint is dry and board is sanded, use chalkboard paint to cover the magnetic paint. 11}. We painted 2 coats. Let dry for 24 hours. 12}. Dismantle clothespin and paint. Let dry. 13}. Assemble clothespin with chalk.
![]() 14}. Hot glue small magnets to embellishments. We used a strand of 6 jewelry beads that matched our board. 15}. Pick out coordinating ribbon. 16}. Paint the trim of your board. Let dry. Using a gloss paint, coat the trim of the board, the letters and the clothespin to give it a good glossy shine. Let dry. 17}. Using hot glue, attach the ribbon to the back of the board. I also used a staple gun for extra durability. 18}. Cut out small felt circles and cover staples. 19}. Add two more felt circles to the bottom of the board to prevent banging or swinging when hanging.
14}. Hot glue small magnets to embellishments. We used a strand of 6 jewelry beads that matched our board. 15}. Pick out coordinating ribbon. 16}. Paint the trim of your board. Let dry. Using a gloss paint, coat the trim of the board, the letters and the clothespin to give it a good glossy shine. Let dry. 17}. Using hot glue, attach the ribbon to the back of the board. I also used a staple gun for extra durability. 18}. Cut out small felt circles and cover staples. 19}. Add two more felt circles to the bottom of the board to prevent banging or swinging when hanging.
![]()
![]() The board was a hit at her graduation party! Let me know if you decide to try it out and be sure to send me pictures!!
The board was a hit at her graduation party! Let me know if you decide to try it out and be sure to send me pictures!!


Hot glue your letters and add your magnets. If I were doing it all over again, I would add a magnet to the clothespin instead of gluing it down so it could be removed if necessary.
FINAL PRODUCT!

No comments:
Post a Comment